Launchpad

Launchpad hub

The Genesis Launchpad enables you to create new financial applications rapidly.

It provides access to Genesis Create, which enables you to create a project and generate the code for a working application, and the Genesis Cloud Workspace, where you can load your Create projects, examine and edit the code, as well as build, and run your application - all within your browser.

genesis Launchpad projects

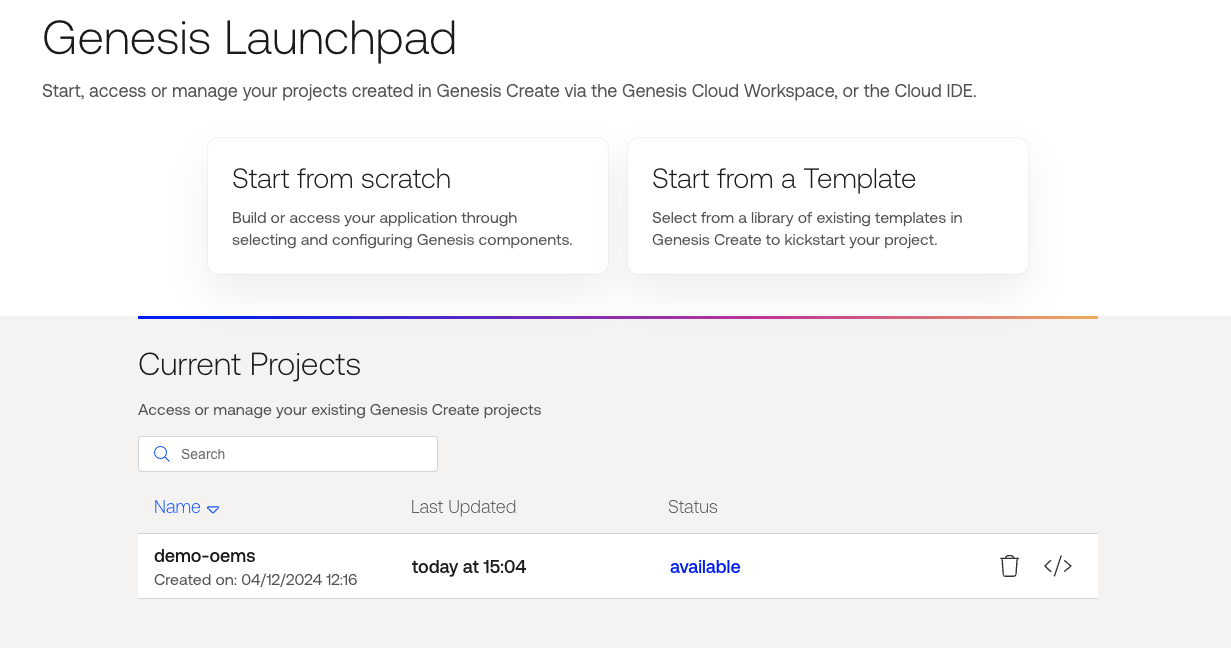
When you start the Launchpad, the main hub screen is divided into two.

  • In the upper area, you can either start a new project from scratch, or else select from a list of pre-configured templates.
  • In the lower area, your current projects are listed. You can click on the Open in code button on any of these and start working.
info

You can have up to 100 projects.

Launch and run a project

Migrating existing Genesis projects from the previous version of Launchpad

If you created a project using an earlier version of Launchpad, it will not be listed in your Current Projects.

Follow the process for adding a project to Current Projects to add your project and start work.

Genesis Templates

Genesis Templates are pre-configured Genesis Create projects. You can use them as a start point for your Genesis projects.

To view the list of available templates from Launchpad, click on 'Start from a Template'.
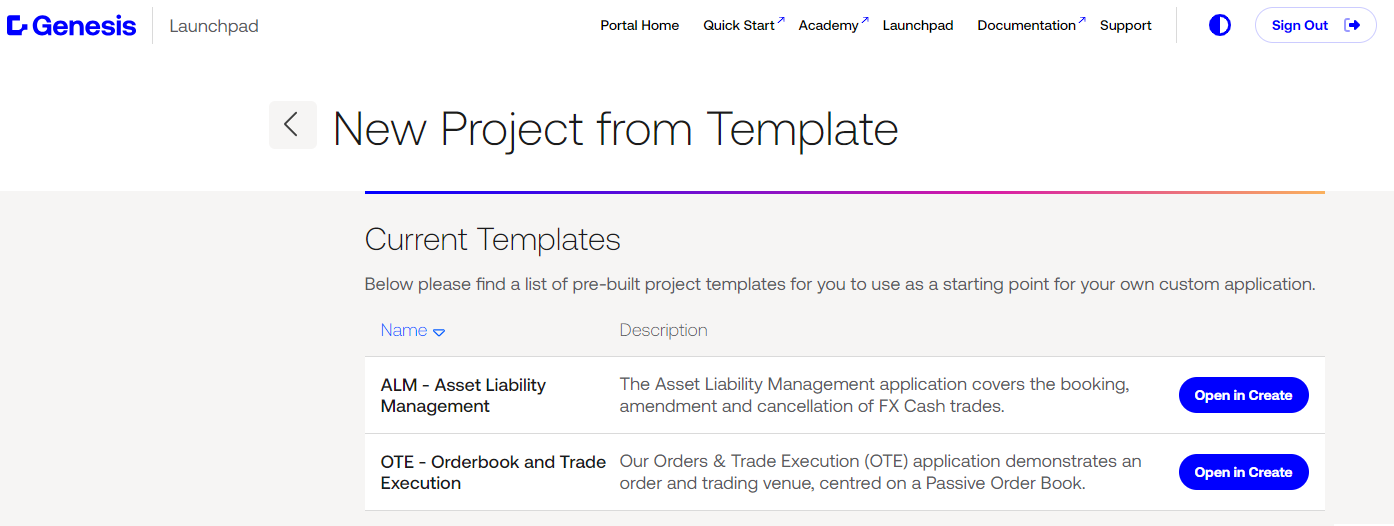
Launchpad project templates

You can click to open one of the templates in Genesis Create.

info

If you already have a project in Genesis Create, then you will be prompted to overwrite the current project - so make sure that you have saved any changes that you want to keep.

Template overwrite prompt

Once the template is open, you can inspect the project, make changes to the pre-configured details, or you can build and run immediately.

Adding a project to Current Projects

If you have created a project in your workspace before the new launchpad interface, it will not automatically appear in your current projects in Launchpad. To add a project:

  1. Press F1 to activate the command bar at the top of VSCode.

  2. Search for genesis: sync.

  3. Run Genesis: Sync projects to launchpad.

  4. Click on 'View on launchpad'.

    This synchronizes your Genesis projects with Launchpad. If prompted, click Open to confirm that you want to open on an external website. This displays your project in the Current Projects.

Deleting a project

If you want to delete your project, go to the list of your current projects and click on the delete icon.
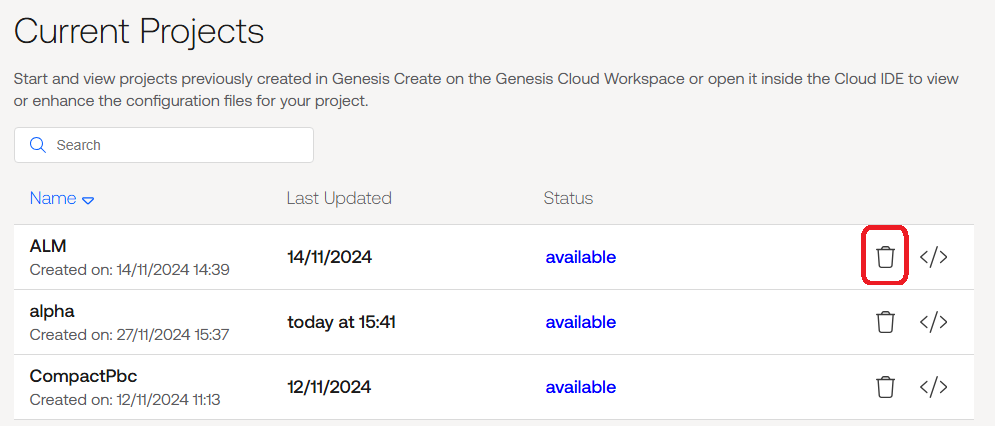
Deleting Project

Genesis Create

Genesis Create is a tool to bootstrap new project ideas. It enables you to build out the data model, and add and configure many of the Genesis server and UI components. You can then generate the project codebase to examine and edit the code, before building and running your application.

Genesis Create is accessed via the Launchpad. Otherwise, go directly to https://portal.genesis.global/create/

Genesis Create has tooltips throughout. Hover over question marks and buttons to see more details and handy links to documentation.

First steps in Create

The following documentation serves as a guide for users brand new to Genesis Create. It provides an overview of many of the key steps in project generation to get you started. Not all components are covered.

Create steps

Project Attributes

The first step is to name your project and select the Genesis components that you need.

  1. Give your project a usable name. This will be used in the file names, so keep it short and practical, and do not use spaces.
  2. Provide a description of the project, which will become the README file. Markdown formatting is supported.
  3. Select the components that you want to include in your application (in addition to the mandatory components). To add a component, click on the Add Genesis Components button at the top right.
tip

Selected Components

A Genesis application is built from a set of components that have different purposes. The components you have selected are listed in the Selected Components area.

Note that Base Genesis Server and User Authorization are mandatory.

You need to give some thought to your requirements at this point. Click on Add Genesis Components and take a look at what is available.

You almost certainly want to select Real Time Queries. This makes data from your database available to the front end.

If you want to consume data from another system or to publish data from this application to another system, select Data Pipelines.

When you have finished, click on the Next button at the bottom right of the window to go to the next step.

Entity Models

In this step, you define the entities for your application. An entity is essentially a table that can contain records. For example, you could define a counterparty, a trade, a currency, and so on.

Each entity needs a list of attributes (fields), and one of these must be the primary key - the unique way of identifying each record in the table. So, your COUNTERPARTY entity might need an automatically-generated unique ID (which would make a good primary key) as the first attribute. You could then add attributes such as COUNTERPARTY_LONG_NAME, COUNTERPARTY_SHORT_NAME, and so on.

Creating a new entity

To define an entity, click on the New Entity button at the top right. In the screen displayed:

  1. Type a name for the entity and click on Save. All characters are converted to caps and all spaces are converted to underscore.
  2. Optionally, you can click to set two things: • Generate Audit Trail sets automatic auditing of every change to the table. • Enable right codes creates codes that control view and update access to this table. You can edit the default codes, if required.
  3. To add the attributes for the entity, make sure that the New Attributes panel is displayed on the right (select the Attributes tab in the main area if necessary).

Adding attributes to an entity

For each attribute that you want to add, make sure that the New Attributes panel is displayed. First, let's look at adding a primitive - a standard type of data, such as STRING or INTEGER.

  1. Make sure that the Primitive button is selected.
  2. Select the Type of data (STRING, INTEGER, BOOLEAN, etc). This controls the other fields available for that type.
  3. Enter a unique name for the field.
  4. Enter or select any other relevant values in the panel, such as default values. In the example below, we are adding an attribute called CURRENCY_ID of type STRING.

new primitive

  1. Click on the Add Attribute button. This adds the attribute to the list in the main area.

Primary key

The primary key is the default way to find records in an entity. Every entity has to have a primary key.

When the attributes for your entity are listed in the main area, you can set the primary key for the entity. Select the Primary Key checkbox for the relevant attribute(s) to make the record unique. If yu want to select multiple fields (to create a multi-field key), the ordering your of the selected attributes is important. You can re-order by clicking the symbol on the far right and dragging your attributes.

Here, we have selected CURRENCY ID as the primary key. We have also set Generated so that the value of this attribute is generated automatically. Each new record submitted will have a unique sequential integer for this field, prefixed with the letters CU.

Primary key

Note that edit and delete buttons are available to the right of each attribute in the list, so you can go back and change any attribute you have already set up.

Indices

An index gives you extra ways of searching for records on the entity. For example, users might want to find trades by instrument or by currency symbol.

Indices can be unique, which enables you to find a single record or non-unique, which enables you to find a range of records.

To add an index to the entity that you are creating or editing:

  1. Click on the Indices tab to view the indices for the entity.
  2. A delete button is displayed to the right of each index (except the primary key, which cannot be deleted).
  3. Use the New Index panel to add a new index.
    • You can select one or more fields for the search, depending on the attributes in the entity.
    • use the Type field to make the index unique or non-unique.
    • A default name for the index is displayed in the Name field. You can change this, if necessary.
    • When ready, click Add index. The new index is listed in the main area under the Indices tab.
  4. When you have finished, click on the Done button to return to the Entity Models screen, where all your entities are listed..

Entity references

Entity references are useful, because they enable you to add attributes from different entities to create views. You can select another entity as a reference, and then you will be able to add fields from that entity to create a view later on.

tip

You must have at least one entity reference in a view if you want to be able to create a view from that entity

To create a reference to another entity:

  1. In the New Attribute panel for your entity (when you are creating or editing a new entity), click on the Entity Reference button.

  2. Click at the end of the Type field. The dropdown list includes all the entities that you can refer to.

Entity references

  1. Select the relevant entity. The primary key of that table is displayed for information.

  2. Click on the Add references button. This displays the reference in your list of attributes.

Once you have added all the attributes to your entity, click on the Done button to return to the main area, where all your entities are listed.

Right codes

Right codes

You have the chance to set right codes at many points in Genesis Create. These codes enable you to control which users have access to items in the database. They give you a great deal of flexibility in controlling access.

We strongly recommend that you use these.

Adding more entities

When you have finished adding entities, click on the Next button at the bottom right of the window to go to the next step.

Views

Views enable you to display information from more than one table in a single place.

For example, if you want a view of all your trades, you would want the TRADE table (we call that the root entity for the view), but you would add information from the COUNTERPARTY and INSTRUMENT tables as well.

To create a new view, click on the New View button at the top right.

Click at the end of the Root Entity field and select an entity from the dropdown list. This displays a default name for the view in the View Name field.

Underneath, this displays the entities you can join with to create a view. These are listed because your root entity includes entity references to those tables.   To join to one of the entities listed:

  1. Click on the Selected checkbox.
  2. Click on the Attributes tab; you can now see all the attributes for the view, including the attributes from the entity you have joined.
  3. Click on a Selected checkbox for an attribute to add it to or remove it from the view.

Selecting attributes for a view

When you have finished, click on Done.

Derived attributes

You can also create derived attributes. These enable you to create a new value from one or more existing attributes. For example, you could divide NOTIONAL attribute by 100 to produce a fee of 1 percent.

To add a derived attribute to the view you are creating or editing:

  1. Click on the Derived Attributes tab.
  2. Click on Add Derived Attribute.
  3. Enter a name for the attribute.
  4. Select one or more attributes to be used to create the new value.
  5. In the Output Type field, select the data type of the attribute (such as DOUBLE or INT). In the example below, we are creating a derived attribute called FEE of type DOUBLE from two existing attributes.

Entity references

  1. Click on Save and Return to the main screen for your view.
  2. When you have finished, click on the Done button. This returns you to the list of views.

Finishing views

When you have finished, click on the Next button at the bottom right of the window to move on to the next step.

Queries

Queries make real-time information available to the front end.

Adding To Dos and comments

Right codes

At various points, this link enables you to insert TO DO statements and comments that will appear in the generated code. Take time to use this feature; it will save you time later on.

To add a query:

  1. Click on the New Query button at the top right.
  2. Click at the end of the Entity or View field and select an entity from the dropdown list. This displays a default name for the view in the Query Name field, which you can change if necessary.
  3. Click on the Add Query button.
  4. This displays all the fields in that entity. You can click to remove any fields you don’t want to include.
  5. When you have finished, click on Done. Your new query appears in the list on the Queries page.

After you have added all the queries you need, click on the Next button to move on to the next step.

Consolidators (optional component)

A consolidator can aggregate records in useful ways. It listens to changes to records in a specified entity and aggregates their values into a specified output entity.

For example, it can aggregate Trades into Positions or Orders. Or it can aggregate Payments into Netted Payments.

To add a consolidator:

  1. Click on the New Consolidator button at the top right.
  2. Type a name for the consolidator in the Consolidator Name field.
  3. To aggregate, you need to select the Input Attribute and Output Attribute to group by. The output attribute is determined by the input attribute you select.
  4. Check the fields for configuring the aggregation. The most important field is the Aggregation Function, which enables you to select the logic for the aggregation, which could be SUM or AVG, for example. (To handle more complex logic, you can customize this in the generated code later on.) When you are happy, make sure that the Enabled checkbox is set.
  5. Click on Done to return to the Consolidators page, where your new consolidator is listed.

When you have finished working with consolidators, click on the Next button at the bottom right to moe on to the next step.

User Interface

This step enables you to create the web client for your application.

By default, you are given a main or home page that is the landing page for your app (login is set up for you automatically). You can change the name of the page or add new pages to work with.

In the example below, we have called our landing page FX Blotter. You can create another page by clicking on the + tab next to the page title and supplying a name for the new page.

Landing page and tab for creating a new page

tip

When you have multiple pages, you can click on the Manage pages link on the tight to edit, add and delete pages.

You can build each page by a adding tiles. Each tile contains a component, such as a grid display or a chart.

Adding a tile and component

To add a component to a page:

  1. Click on Add Tile. This displays a panel where you can select your components.
  2. Type a name for the tile. This is used in the code, so keep it short and practical.
  3. Scroll through the components in the panel and select the radio button for the one you want, for example, Real-Time Data Grid + Modifications. Then click on Submit.

![Adding a new tile and component](/img/genesis-launchpad/new tile.png)

  1. The display changes and you need to complete the configuration fields for the component. These depend on the component you have selected. At minimum, you need to specify a Data Source.

    For example, the fields for configuring a grid look like this:

Adding a new tile and component

Once you have specified the source of the data, you can see the attributes that will be displayed in the form.

Adding a new tile and component

Note that you can select to hide some or all of the attributes. You can also change the order of fields and the format (such the number of decimal places).

Configuring the attributes in a form

  1. Once you have finished, click on the Done button. This displays the tile and its component in the main list.

Configuring each component

In the main list, there are edit and delete buttons for each tile in the list. There is also a Config column, which shows a red warning triangle if the component needs to be configured.

Configuration icons for UI components

Click on the edit button for the tile. This displays the configuration details for the relevant component in the tile.

Completing the UI

When you have added all the UI components you need, click on the Next button at the bottom right of the window to move on.

Summary

When you reach the Summary page, you have completed the configuration of your project.

The next step is to generate the code so that you can build and deploy.

Opening in your Genesis Workspace

To do this, click on Save to Genesis Workspace. This loads your project in your Launchpad hub.

Downloading your project to run locally

Alternatively, you can download your project to run locally following this guide:

Exclude Gradle Wrapper JAR

Exclude Gradle Wrapper JAR

By default, your generated project includes a JAR file so that you don't need to have the Gradle build tool available locally. Some institutions block these JAR files. If this affects you, make sure that Exclude Gradle Wrapper JAR is set to exclude the JAR. After you have unzipped your project, you must then install gradle manually following these instructions.

info

For the instructions below, change {URL} to be either:

If your local Gradle installation version is ≥ 8.3 or 7.6.4, you can simply run gradle wrapper --gradle-distribution-url={URL} at the project root level. If you don't have this, else if you receive errors, follow these instructions:

  1. Download the Gradle zip distribution manually from {URL} and unzip it.

  2. Run the following command in your project's root directory. The command assumes you unzipped the gradle download in ~/Downloads and this part of the command should be changed accordingly if you are using another directory:

    ~\Downloads\gradle-8.3\bin\gradle.bat wrapper --gradle-distribution-url={URL}

Genesis Cloud Workspace

When you open a project listed in your launchpad hub it will open the project in your cloud workspace.

Building the project

  1. Click on the code icon for the project you created.

    Current user projects

This will open the project in a web IDE - VSCode.

  1. When the project is open, click on the top bar of VSCode. Select Show and Run Commands from the drop-down.

    Show and Run commands

  2. Type Gen in the top bar to display a list of Genesis commands. Select Genesis Build Project.

    SGenesis Build Project

    This builds the entire project and downloads all the dependencies. The first time you build, the process can take up to five minutes.

When the build has finished, the message BUILD SUCCESSFUL is displayed in the Terminal area.

Viewing the code

To view the code for your project, click on the Explorer button on the extreme left of your VSCode window.

Explorer button This displays the directory structure and the files for your back end and front end.

Where your files are

Your entities and views files are in the /server/{appname}/ src/main/genesis/cfg folder.

  • The entities are in {appname}-tables-dictionary.kts.
  • The views are in {appname}-view-dictionary.kts.

Your queries and event handlers are in the /server/{appname}/src/main/genesis/scripts folder.

  • The queries you have created are in {appname}-dataserver.kts.
  • Events enable you to interact with the database. These are autogenerated by Create and they are in {appname}-eventhandler.kts.

Front-end files are in the client/src/main folder. You can see the three pages for your home (main) page, an index page (which makes the files visible to the front end) and a css (stylesheet):

  • index.ts
  • main.ts
  • main.styles.ts
  • main.template.ts
  • main.css

Starting the app

  1. To start your app, go to the side toolbar of your VSCode window.

    Run and Debug button

  2. Click on the Run and Debug button.

  3. Near the top left of the window, click on the RUN AND DEBUG dropdown and select Bootstrap + Start App.

Bootstrap and Start App

  1. Then click on the Start button to the left of the field.
Wait a few minutes!

Bootstrap + Start App launches several commands in the terminal to create the database, load data and apply permissions. Upon completion, it starts all required processes.

  1. Click on the Genesis button in the side toolbar to view the Genesis Process Monitor.

    Genesis button

  2. Wait for all processes to be UP before moving on.

    Genesis Process Monitor

Opening your app

When all the services are UP, you are ready to start the front end and view your app.

  1. Go to the Ports tab at the bottom of your screen, then select the Globe icon.

    The glove icon in the Ports tab

  2. If you are prompted, make sure that pop-ups are not blocked on your browser.

  3. To log in, you need the user name admin and the password genesis.

Then you can look through your app and interact with the different displays you have created.

Interact with your app

Looking at and changing the code

When you are ready to look deep into the code and make the refinements and extensions you need, go back to VSCode.

It is good practice to stop the processes before you make any changes. Click on the top bar of VSCode and look for the Genesis Stop Processes command.

Find your ToDos

In the panel on the extreme left of your VSCode window, there is a button that displays the ToDo Tree.

TO DOs Tree button

You were able to add your own To Do comments during the Create process.

When the code is generated, Genesis adds more of these To Do comments at key points to direct you to the most likely places where you will want to refine or extend the scope of your app.

Click on the ToDo Tree button to view these directly. This displays the top of the tree.

The To Do tree

Expand the tree to see where your To Dos are located.

Expanded To Do tree

Changing the code – and restarting

Once you have a changed a file in VSCode, you need to restart the processes for your app to include the changes.

To restart a process after making changes:

  1. Go to the Process Control toolbar under the quick search panel in VSCode. (This is only displayed when there are processes running.)
  2. Select {app-name}_COMPACT_PROCESS from the list.
  3. Click on the Refresh button. Refresh button on the process control bar
Saving resources

The COMPACT_PROCESSES option runs a number of tasks as a single process. This saves you a lot of memory – which you could find useful if you are building and running locally.

Genesis commands in VSCode

All the Genesis commands in VSCode are prefixed with Genesis:.

To run one of the commands below, click on the top search bar in VSCode and select Show and Run Commands:

Show and Run Commands

Then as soon as you start to type Genesis, the available commands are displayed for you to select.

Commands available for selection

CommandDescription
Build projectBuilds (compiles) all components and triggers Generate Configs (see below)
Create project zipWrites the workspace contents to project-zips. See below.
Delete databaseClears the local H2 database (all applications). This erases the data and schema; **use with caution - these cannot be recovered. Use this only to exit from an unrecoverable state
Generate configsCreates a configuration under the .vscode/settings.json in the .vscode/launch.json` folder. The content there is auto-generated and must not be modified, as it will be overwritten if the command is re-run.
Generate tasksGenerates all the required build tasks. This command is automatically triggered when you unpack the project. Later on, it is used by Build project. It creates a list of build tasks that are required to compile and build the application. Use this when you need to regenerate .vscode/tasks.json.
Stop processesKills all running Genesis processes on the JVM or server and the Web UI. Use this command when processes are unresponsive.
Sync projects to launchpadEnables you to add a Genesis Create project that was created outside Genesis Create (or an existing project created on an older version of Genesis Create) to your list of Current Projects.
Unpack projectThis command is no longer necessary, and has been deprecated. See the Troubleshooting section.

Using Genesis: Build project

Running Genesis: Build project builds (compiles) all components for the app and triggers Generate Configs (see above).

You can right-click on the file generated and download it to your local machine to open and run the project there.

The folder created by the command is a temporary store. Running the command again will delete and recreate all its files.

Launch configurations

The exact list of configurations for your application is dependent on the components that you have chosen. For example, if you have included the Reporting component, then your application will have a configuration for running it.

However, there is a set of launch configurations that will always be available. These are listed below.

To run any of these:

  1. Click on the Run and Debug button on the side menu at the left to display the RUN AND DEBUG panel at the top left of the VSCode window.

  2. Click in the RUN AND DEBUG field and select a command from the dropdown list.

Launch configurations

  1. Click on the start button to the left of the field.
CommandDescription
DBMonStarts the DbMon command.
Bootstrap + Start AppRuns all the required dependencies, such as creating the database and applying app's permissions. It then starts Web UI and all Server processes.
ResourceDaemonStarts the Genesis Resource Daemon, allowing tracking which processes are running under the Genesis Processes view.
Start AppStarts the App's Web UI process.
Start ServerStarts all the App's Server processes.
Start UI System Design ConfiguratorStarts the Design Configurator. You must be on Foundation-UI 14.213.0 or later to use this.

Making direct requests to the Server API

Being able to integrate with existing third-party systems and services is an important part in evaluating the capabilities of the Genesis platform. The steps below detail how you are able to interact with your application running in Genesis Launchpad.

Getting the required data

You will need to get the the API_HOST from the vscode environment variable and the authenticated cookies from your session.

Application url
  1. Open terminal in VSCode workspace flyout menu -> View -> Terminal.

  2. enter printenv API_HOST.

  3. replace wss with https and store this value, it is fixed to your workspace so you can save it.

Request headers (Auth cookies)

These are needed for secure access of your app from the Development portal.

Getting cookies with Postman interceptor plugin

You can simplify getting cookies for requests using postman interceptor plugin for your browser.

  1. Go to cookies on request edit pane in Postman.

  2. go to the 'Sync cookies' tab.

  3. click on the hyperlink for interceptor and proxy.

  4. follow the text till you find the install interceptor hyperlink which you will click.

  5. click on the correct hyperlink to install the plugin for your browser.

  6. sync cookies tab will show you are connected and from there you can add the url of the launchpad to then sync cookies.

  7. your cookies will then be synced shown 'Manage Cookies' tab.

With this if you use the same url for sync cookies, it will autofill the cookies to your request headers.

Getting cookies manually via web inspector
  1. Be logged in to launchpad.

  2. either right click and press inspect or do F12.

    This should open the developer tools for your browser.

  3. Go to the Application tab at the top of the developer tools.

    tip

    if you cannot see the application tab you can add new tabs by pressing + on Edge or >> on Chrome. Or drag the developer tools pane out to make space for the tabs to appear.

  4. Go to cookies in the sidebar and open the cookies for the website.

    There should be AWSELBAuthSessionCookie-0, AWSELBAuthSessionCookie-1. You will be putting this in your requests headers.

When setting the header the tokens need to be structured as AWSELBAuthSessionCookie-0=TOKEN;AWSELBAuthSessionCookie-1=TOKEN;

Sending requests using postman

Postman can be used to test the API from your project.

For the postman request you will use:

  • The API_HOST for the base url with the request at the top
  • Tokens stored in 'Cookie' header
  • raw json Body depending on the event you are sending

An example for login would have https://portal.genesis.global/workspace/<<WORKSPACE_ID>>/proxy/9064/event-login-auth url.

The body would be:

{
"MESSAGE_TYPE": "EVENT_LOGIN_AUTH",
"SERVICE_NAME":"AUTH_COMPACT_PROCESS",
"DETAILS":{
"USER_NAME": "admin",
"PASSWORD": "genesis"
}
}

This looks like:

Postman request body

The tokens are stored in a cookie header

Postman token header

Sending requests using the CLI

You can use any http client like curl to send a request from within the workspace itself or directly from your workstation.

For Curl you will need:

  • location: the API_HOST value.
  • cookie header: header for storing token for access.
  • content-type header: for setting content to json
  • body: for the details you will be sending to the request

Here is an example of login with curl:

curl --location 'https://portal.genesis.global/workspace/<<WORKSPACE_ID>>/proxy/9064/event-login-auth' \
--header 'Content-Type: application/json' \
--header 'Cookie: AWSELBAuthSessionCookie-0=; AWSELBAuthSessionCookie-1= \
--data '{
"MESSAGE_TYPE": "EVENT_LOGIN_AUTH",
"SERVICE_NAME":"AUTH_COMPACT_PROCESS",
"DETAILS":{
"USER_NAME": "admin",
"PASSWORD": "genesis"
}
}'

Genesis tasks

The tasks described below are used by the various commands above to launch a configuration manually. You can call them individually, when required.

To run a task, click in the top search bar in VSCode, then select Run Task.

Running a task

This displays the tasks for you to select.

Genesis tasks

TaskDescription
Genesis Bootstrap webInstalls web-ui dependencies.
Genesis buildPerforms a full build of the applications.
Genesis cleanCleans built artifacts.
Genesis ConsolidateRightsRuns script to update access permissions.
Genesis Create project zipGenerates a zip file containing the project contents for download.
Genesis RemapRuns a script to update the database schema and load data.
Genesis SyncSynchronizes configuration between the folder and the deployment of the application, this task runs before launching any java server app.
Genesis Unit testsRuns server-side unit test.

Code snippets

The plugin provides basic code Kotlin snippets that can used to speed up development of the various Kotlin scripts, such as eventHandlers or requestReply codeblocks.

To insert a snippet into one of your .kts files, there are two easy methods:

  • Go to the command bar and use Insert snippet.
  • While editing a .kts file, type the prefix gg to find the snippet to insert.

Troubleshooting

Help, my processes keep dying!

Processes are killed when VSCode detects that the user has left the workspace. This is native to VSCode. Refreshing the page is considered to be leaving the workspace and all processes will be killed.

Can I use multiple browser tabs and have multiple projects open at the same time?

It is highly recommended not to do this. A single workspace is shared amongst different sessions. Code server supports that, but due the nature of Genesis Applications and their resource usage, you will soon notice that processes will start clashing for resources (for example ports). Additionally, workspaces are sized to be able to run only a single stack of Genesis Applications.

I want to bring my project from GitHub, how can I do that?

Use the command: Git: clone. Follow the prompts for authentication and the repos you have access to will be selected.

tip

If you have multiple projects in a single repo (mono-repo structure), after cloning use the command File: Open folder and only open the sub-folder that contains your project.

I’ve brought my own project and the web-ui doesn’t seem to connect

For projects using Genesis Web Components:

  • You are likely to have set API_HOST in the client/package.json; unset this value, as it will use the environment variable supplied by the workspace.
  • Remove -e API_HOST from the dev script.

For Angular-based projects:

  • Add the following arguments in the dev script in client/package.json: --port 6060 --disable-host-check --serve-path $PUBLIC_PATH.
  • Set <base href> on index.html to the same value of the workspace $PUBLIC_PATH environment variable.
  • Set API_HOST on environments/environment.ts to the same value of the workspace $API_HOST environment variable.
tip

Use the integrated terminal to obtain the value of environment variables, for example: echo $PUBLIC_PATH.

Re-Launching your workspace and opening a previous project

  • You don’t need to unpack your project.
  • Click on File → Open Folder: Select the project {timestamp based folder} and then the subfolder under it (which is the project name).

What are Ports and which ones must I have?

When you start an application, VSCode should identify at least ports 6060 and 9064 and add it to the PORTS tab. This enables you to launch the WebUI.

If you have not seen this pop-up or the port has not been added automatically, you can add it manually. Click on the PORTS tab, select Add Port, input the missing port number and then right-click the URL and Launch in Browser - or use the launch icon next to the forwarded address.

My browser claims pop-ups are blocked! What should I do?

Make sure pop-ups are not blocked.

Unblocking pop-ups

I can’t find logs! Where are they?

Logs are streamed per process and available in the standard output. You can find this from the window on the right-hand side. Just find your process from ‘Debug: GenesisProcessBootstrap’. Note you can rename these tasks by right clicking.

Logs are saved in a file under server/app/build/genesis-home/runtime/logs. You can open these directly via the project structure, or using the Genesis Process View.

How do I debug processes?

All processes start in debug mode by default and any breakpoint in java code shall be hit.

Kotlin is not fully supported by VS Code and the language server is currently disabled.

I get a 401 error when I tried to login, what should I do?

This is due how our partner cloud provider handle domain security as it is likely your password manager might be changing the url (your web-browser will usually have a password manager by default). After login, just refresh the page as normal and you will be immediately redirected to the landing page (CTRL + R) / (CMD + R).

I'm no longer able to stop my workspace, where did that go?

Your workspace stops automatically after inactivity, you can still do it using the previous experience.

Why has Unpack project been deprecated?

This is deprecated is no longer necessary and has disabled by default. It can be enabled via VSCode settings in case you need to manually unpack an old project, notice zip files are deleted on a periodic basis.