Genesis Cloud Workspace
When you use Launchpad to open a project, this starts Genesis Cloud Workspace.
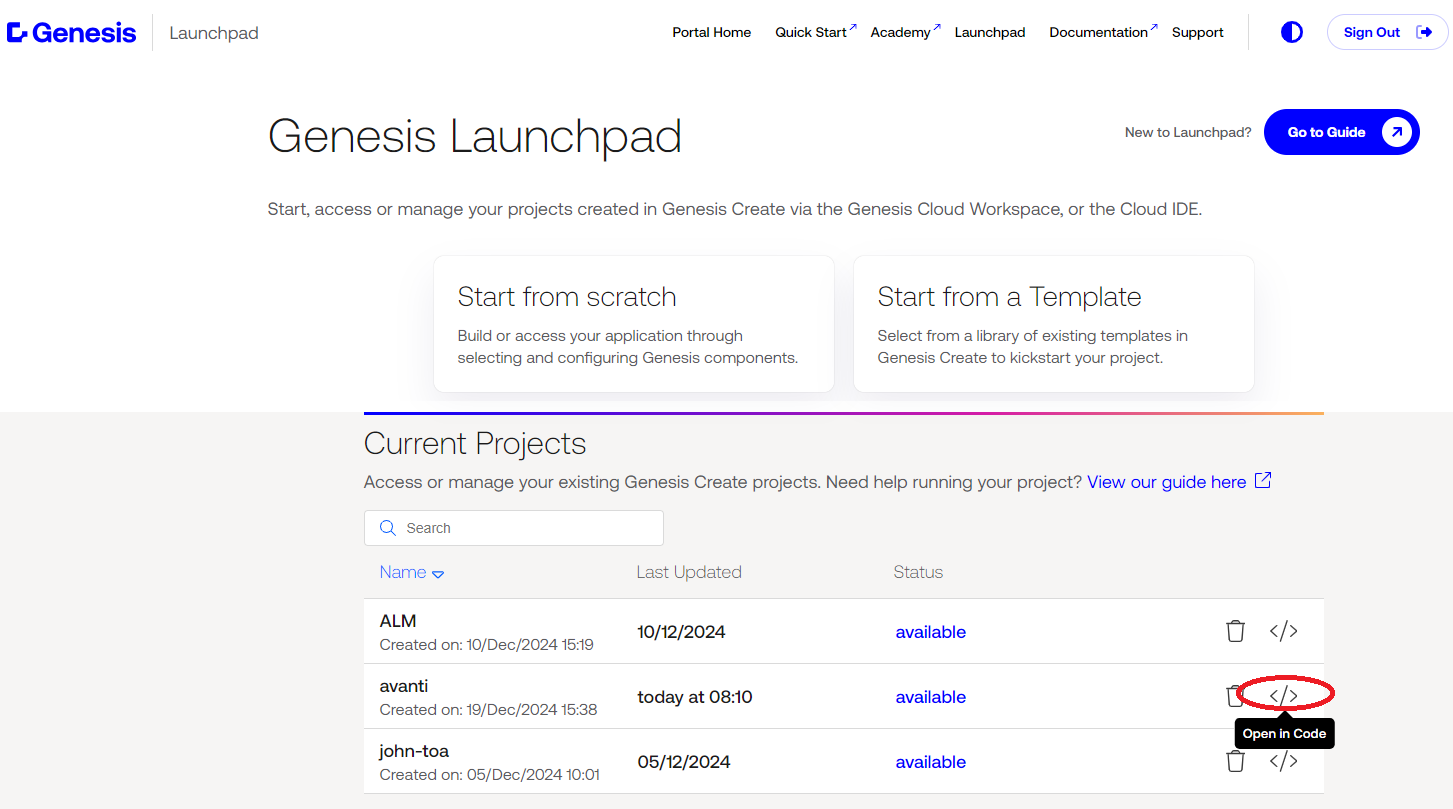
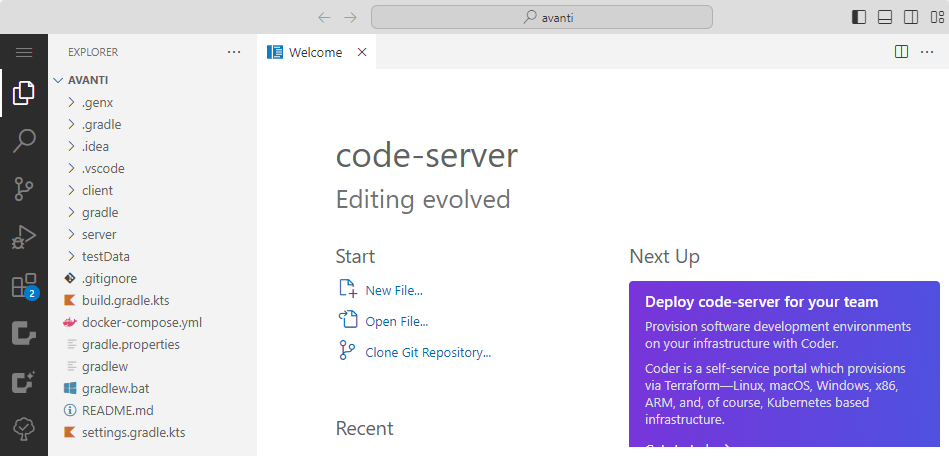
The workspace gives you a browser-based IDE, with your project structure shown on the left.
Building the project
To build your project:
-
Click on the top bar of VSCode. Select
Show and Run Commandsfrom the drop-down. -
Type
Genin the top bar to display a list of Genesis commands. SelectGenesis Build Project.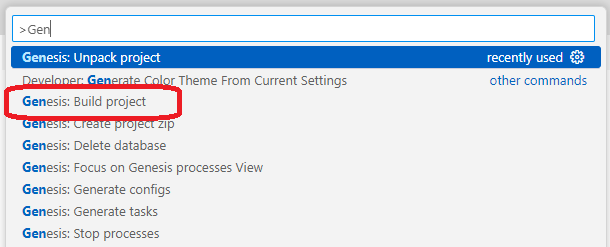
This builds the entire project and downloads all the dependencies. The first time you build, the process can take up to five minutes.
When the build has finished, the message BUILD SUCCESSFUL is displayed in the Terminal area.
Viewing the code
To view the code for your project, click on the Explorer button on the extreme left of your VSCode window.
This displays the directory structure and the files for your back end and front end.
Where your files are
Your entities and views files are in the /server/{appname}/ src/main/genesis/cfg folder.
- The entities are in
{appname}-tables-dictionary.kts. - The views are in
{appname}-view-dictionary.kts.
Your queries and event handlers are in the /server/{appname}/src/main/genesis/scripts folder.
- The queries you have created are in
{appname}-dataserver.kts. - Events enable you to interact with the database. These are autogenerated by Create and they are in
{appname}-eventhandler.kts.
Front-end files are in the client/src/main folder. You can see the three pages for your home (main) page, an index page (which makes the files visible to the front end) and a css (stylesheet):
index.tsmain.tsmain.styles.tsmain.template.tsmain.css
Starting the app
-
To start your app, go to the side toolbar of your VSCode window.
-
Click on the
Run and Debugbutton. -
Near the top left of the window, click on the
RUN AND DEBUGdropdown and selectBootstrap + Start App.
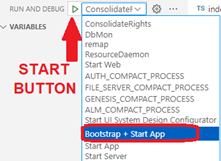
- Then click on the
Startbutton to the left of the field.
Bootstrap + Start App launches several commands in the terminal to create the database, load data and apply permissions.
Upon completion, it starts all required processes.
-
Click on the
Genesisbutton in the side toolbar to view the Genesis Process Monitor. -
Wait for all processes to be
UPbefore moving on.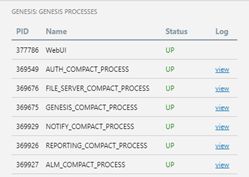
Opening your app
When all the services are UP, you are ready to start the front end and view your app.
By default, a button marked Open in Browser is displayed. You can just click on this to start the app and log in.
To log in, you need the user name admin and the password genesis.
If you don't see the Open in Browser button...
- Go to the
Portstab at the bottom of your screen, then select theGlobeicon for the port displayed.
- If you are prompted, make sure that pop-ups are not blocked on your browser.
If there is no port displayed, click on Add Port and enter the port number 6060.
Now you can look through your app and interact with the different displays you have created.

Looking at and changing the code
When you are ready to look deep into the code and make the refinements and extensions you need, go back to VSCode.
It is good practice to stop the processes before you make any changes. Click on the top bar of VSCode and look for the Genesis Stop Processes command.
Find your ToDos
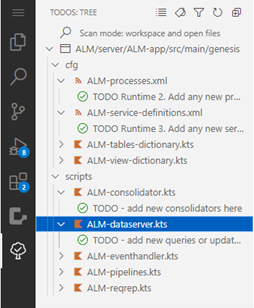
In the panel on the extreme left of your VSCode window, there is a button that displays the ToDo Tree.
You were able to add your own To Do comments during the Create process.
When the code is generated, Genesis adds more of these To Do comments at key points to direct you to the most likely places where you will want to refine or extend the scope of your app.
Click on the ToDo Tree button to view these directly. This displays the top of the tree.

Expand the tree to see where your To Dos are located.
Changing the code – and restarting
Once you have changed a file in VSCode, you need to restart the processes for your app to include the changes.
To restart a process after making changes:
- Go to the Process Control toolbar under the quick search panel in VSCode. (This is only displayed when there are processes running.)
- Select
{app-name}_COMPACT_PROCESSfrom the list. - Click on the
Refreshbutton.
The COMPACT_PROCESSES option runs a number of tasks as a single process. This saves you a lot of memory – which you could find useful if you are building and running locally.
Genesis commands in VSCode
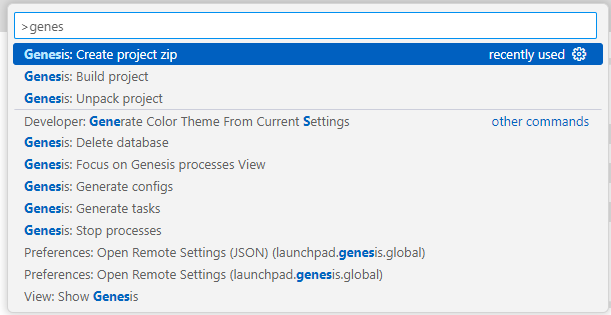
All the Genesis commands in VSCode are prefixed with Genesis:.
To run one of the commands below, click on the top search bar in VSCode and select Show and Run Commands:
Then as soon as you start to type Genesis, the available commands are displayed for you to select.
| Command | Description |
|---|---|
Build project | Builds (compiles) all components and triggers Generate Configs (see below) |
Create project zip | Writes the workspace contents to project-zips. See below. |
Delete database | Clears the local H2 database (all applications). This erases the data and schema; **use with caution - these cannot be recovered. Use this only to exit from an unrecoverable state |
Generate configs | Creates a configuration under the .vscode/settings.json in the .vscode/launch.json` folder. The content there is auto-generated and must not be modified, as it will be overwritten if the command is re-run. |
Generate tasks | Generates all the required build tasks. This command is automatically triggered when you unpack the project. Later on, it is used by Build project. It creates a list of build tasks that are required to compile and build the application. Use this when you need to regenerate .vscode/tasks.json. |
Stop processes | Kills all running Genesis processes on the JVM or server and the Web UI. Use this command when processes are unresponsive. |
Sync projects to launchpad | Enables you to add a Genesis Create project that was created outside Genesis Create (or an existing project created on an older version of Genesis Create) to your list of Current Projects. |
Unpack project | This command is no longer necessary, and has been deprecated. See the Troubleshooting section. |
Using Genesis: Build project
Running Genesis: Build project builds (compiles) all components for the app and triggers Generate Configs (see above).
You can right-click on the file generated and download it to your local machine to open and run the project there.
The folder created by the command is a temporary store. Running the command again will delete and recreate all its files.
Launch configurations
The exact list of configurations for your application is dependent on the components that you have chosen. For example, if you have included the Reporting component, then your application will have a configuration for running it.
However, there is a set of launch configurations that will always be available. These are listed below.
To run any of these:
-
Click on the
Run and Debugbutton on the side menu at the left to display theRUN AND DEBUGpanel at the top left of the VSCode window. -
Click in the
RUN AND DEBUGfield and select a command from the dropdown list.
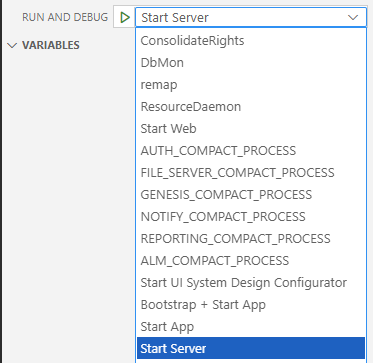
- Click on the start button to the left of the field.
| Command | Description |
|---|---|
DBMon | Starts the DbMon command. |
Bootstrap + Start App | Runs all the required dependencies, such as creating the database and applying app's permissions. It then starts Web UI and all Server processes. |
ResourceDaemon | Starts the Genesis Resource Daemon, allowing tracking which processes are running under the Genesis Processes view. |
Start App | Starts the App's Web UI process. |
Start Server | Starts all the App's Server processes. |
Start UI System Design Configurator | Starts the Design Configurator. You must be on Foundation-UI 14.213.0 or later to use this. |
Genesis tasks
The tasks described below are used by the various commands above to launch a configuration manually. You can call them individually, when required.
To run a task, click in the top search bar in VSCode, then select Run Task.
This displays the tasks for you to select.
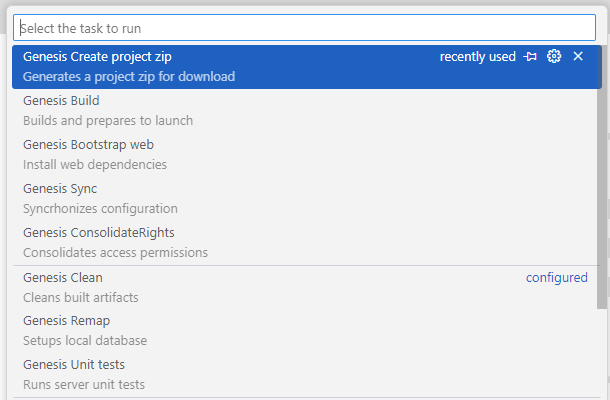
| Task | Description |
|---|---|
Genesis Bootstrap web | Installs web-ui dependencies. |
Genesis build | Performs a full build of the applications. |
Genesis clean | Cleans built artifacts. |
Genesis ConsolidateRights | Runs script to update access permissions. |
Genesis Create project zip | Generates a zip file containing the project contents for download. |
Genesis Remap | Runs a script to update the database schema and load data. |
Genesis Sync | Synchronizes configuration between the folder and the deployment of the application, this task runs before launching any java server app. |
Genesis Unit tests | Runs server-side unit test. |
Code snippets
The plugin provides basic code Kotlin snippets that can used to speed up development of the various Kotlin scripts, such as eventHandlers or requestReply codeblocks.
To insert a snippet into one of your .kts files, there are two easy methods:
- Go to the command bar and use
Insert snippet. - While editing a
.ktsfile, type the prefixggto find the snippet to insert.
Troubleshooting
Help, my processes keep dying!
Processes are killed when VSCode detects that the user has left the workspace. This is native to VSCode. Refreshing the page is considered to be leaving the workspace and all processes will be killed.
Can I use multiple browser tabs and have multiple projects open at the same time?
It is highly recommended not to do this. A single workspace is shared amongst different sessions. Code server supports that, but due the nature of Genesis Applications and their resource usage, you will soon notice that processes will start clashing for resources (for example ports). Additionally, workspaces are sized to be able to run only a single stack of Genesis Applications.
I want to bring my project from GitHub, how can I do that?
Use the command: Git: clone. Follow the prompts for authentication and the repos you have access to will be selected.
If you have multiple projects in a single repo (mono-repo structure), after cloning use the command File: Open folder and only open the sub-folder that contains your project.
I’ve brought my own project and the web-ui doesn’t seem to connect
For projects using Genesis Web Components:
- You are likely to have set
API_HOSTin theclient/package.json; unset this value, as it will use the environment variable supplied by the workspace. - Remove
-e API_HOSTfrom thedevscript.
For Angular-based projects:
- Add the following arguments in the
devscript inclient/package.json:--port 6060 --disable-host-check --serve-path $PUBLIC_PATH. - Set
<base href>onindex.htmlto the same value of the workspace$PUBLIC_PATHenvironment variable. - Set
API_HOSTonenvironments/environment.tsto the same value of the workspace$API_HOSTenvironment variable.
Use the integrated terminal to obtain the value of environment variables, for example: echo $PUBLIC_PATH.
Re-Launching your workspace and opening a previous project
- You don’t need to unpack your project.
- Click on
File → Open Folder: Select the project {timestamp based folder}and then the subfolder under it (which is the project name).
What are Ports and which ones must I have?
When you start an application, VSCode should identify at least ports 6060 and 9064 and add it to the PORTS tab. This enables you to launch the WebUI.
If you have not seen this pop-up or the port has not been added automatically, you can add it manually. Click on the PORTS tab, select Add Port, input the missing port number and then right-click the URL and Launch in Browser - or use the launch icon next to the forwarded address.
My browser claims pop-ups are blocked! What should I do?
Make sure pop-ups are not blocked.
I can’t find logs! Where are they?
Logs are streamed per process and available in the standard output. You can find this from the window on the right-hand side. Just find your process from ‘Debug: GenesisProcessBootstrap’. Note you can rename these tasks by right clicking.
Logs are saved in a file under server/app/build/genesis-home/runtime/logs. You can open these directly via the project structure, or using the Genesis Process View.
How do I debug processes?
All processes start in debug mode by default and any breakpoint in java code shall be hit.
Kotlin is not fully supported by VS Code and the language server is currently disabled.
I get a 401 error when I tried to login, what should I do?
This is due how our partner cloud provider handle domain security as it is likely your password manager might be changing the url (your web-browser will usually have a password manager by default). After login, just refresh the page as normal and you will be immediately redirected to the landing page (CTRL + R) / (CMD + R).
I'm no longer able to stop my workspace, where did that go?
Your workspace stops automatically after inactivity, you can still do it using the previous experience.
Why has Unpack project been deprecated?
This is deprecated is no longer necessary and has disabled by default. It can be enabled via VSCode settings in case you need to manually unpack an old project, notice zip files are deleted on a periodic basis.