Project structure
The standard Genesis application project structure allows for a full-stack application to be contained in a "mono repo".
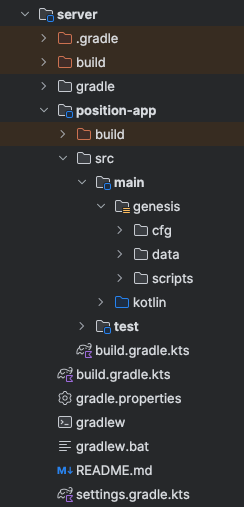
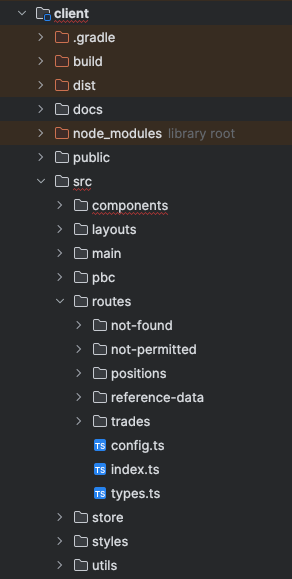
In the project root there are two important directories, server and client. They contain all the files required for the client web (front end), and server (back end) codebases.
server
The server directory contains all files and directories required to build and maintain the server side of an application.

The default single main app module, named <application_name>-app by standard (if you need to change it, be sure to update in the settings plugin too), and contains application code. All the project’s server files can be put in this single module, including configuration files, GPAL scripts and other Java/Kotlin code.
It is not mandatory to put everything in this one module; you can add as many as you like, but there is no longer a requirement to have more than one.
Under it's src/main/ directory there are two directories included as standard which are maintained by developers and contain the application's server logic:
genesis: contains application specific configuration and DSL code.kotlin: contains kotlin code required by the application. This may be left empty where an application only needs to use the DSL.
genesis
This directory contains 3 main directories:
cfg
Contains all .xml configuration files, and any .kts Genesis DSL files which generate DAOs, which are as follows:
*-system-definition.kts*-tables-dictionary.kts*-view-dictionary.kts
Any platform module provided cfg files which are placed in here will take precedence over that platform module provided file.
data
Contains data files for the application. The typical use case is .csv files in SendIt format that can be loaded into the application's database. This data directory will be part of the built application and thus is intended to be data which would be loaded into a production instance.
It will be bundled in the application's distribution zip. Test data which should not go into a production environment should be placed in the to the testData directory.
When remap is run with --dataLoad (which happens as standard when remapping using Genesis Start and IntelliJ plugin), it will attempt to load in data from this directory into the application database.
scripts
Contains Genesis DSL files used to configure most of the server capabilities. Any which do not generate DAOs (as they refer to DAOs) should live in this directory. PAL definitions (Data Server, Event Handler, and so on) can also be defined in compiled Kotlin classes under src/main/kotlin (in a package that is scanned by the process), using the same DSL; see GPAL Standards.
Any platform module provided cfg files which are placed in here will take precedence over that platform module provided file.
testData
The testData directory in the project root is intended to contain any data which might be helpful when developing the application but should not go into a production system. It can contain a data subfolder (testData/data) which is similar to the application's data in that it should contain .csv files in SendIt format that can be loaded into the application's database.
It will not be bundled in the application's distribution zip. Data required in all environments including production should be placed in the data directory.
When remap is run with --dataLoad (which happens as standard when remapping using Genesis Start and IntelliJ plugin), it will attempt to load in data from this directory into the application database.
Gradle
Gradle files and directories can be seen throughout the project structure, all have gradle included in the name. They are required to execute gradle commands, which, for example, build the entire application and execute commands such as launching Genesis Start and powering much of its functionality.
Gradle wrapper
Fundamental to running gradle commands is the gradle wrapper directory. The gradle version properties and gradle jar live here.
Build
There are various build directories which are generated at build time when building, or running the app locally. These files and directories are excluded from source control for this reason.
The most important to be aware of is genesis-home which, after a build, will include all the application provided server module files. They are needed to run the application locally and when needing to override platform provided files
Adding new modules to a project
Although most of your application code in the single main module, you might still want to extract parts of the code for easier maintenance.
To add a new module:
- Create a sub-directory in the /server directory.
- Create source directories under it as required (
/main/java,src/main/kotlin,/src/main/resources) - Create a
build.gradle.ktsfile in the root of the new module:
dependencies {

}

description = "myapp-newmodule"
- Add any required dependencies for this module inside the dependencies block in the file above. If you want to depend on the code that is generated from your main app module, add the following:
dependencies {
    genesisGeneratedCode(withTestDependency = true)
}

description = "myapp-newmodule"
- Add an
includefor the new module in/server/settings.gradle.kts:
...
include("myapp-newmodule")
Adding multiple source sets (logical sub-apps)
It is possible to split configuration and scripts into multiple folders. This can be convenient when logically grouping different logical applications user the same Genesis application stack.
Example: Assuming a product called alpha-app, one could add beta and charlie configuration and scripts:
alpha-app
├── build.gradle.kts
└── src
    ├── main
    │   ├── charlie
    │   │   ├── cfg
    │   │   └── scripts
    │   ├── genesis
    │   │   ├── cfg
    │   │   ├── data
    │   │   └── scripts
    │   ├── java
    │   │   └── mycompany
    │   └── kotlin
    │       ├── global
    │       └── mycompany
    └── test
        ├── kotlin
        │   └── global
        └── resources
            └── genesisHome
During the build and packaging processing, all configuration and scripts are treated as belonging to the same unit.
client
The client directory contains all of your application's web client code.

The most important directory to be aware of is the client/src/routes which contains all of the application's routes and the components they contain.