Quick start - build and deploy
The application has three files that contain vital configuration information:
- alpha-processes.xml
- alpha-service-definitions.xml
- genesis-system-definitions.kts
Process and service definition
At present, these files are empty. You need to insert the details of the Data Server and Event Handler that you have just created.
Add the following content to the server/jvm/alpha-config/src/main/resources/cfg/alpha-processes.xml file:
<processes>
    <process name="ALPHA_DATASERVER">
        <groupId>ALPHA</groupId>
        <start>true</start>
        <options>-Xmx1024m -DXSD_VALIDATE=false</options>
        <module>genesis-pal-dataserver</module>
        <package>global.genesis.dataserver.pal</package>
        <script>alpha-dataserver.kts</script>
        <description>Displays real-time details</description>
        <language>pal</language>
        <loggingLevel>DEBUG,DATADUMP_ON</loggingLevel>
    </process>
    <process name="ALPHA_EVENT_HANDLER">
        <groupId>ALPHA</groupId>
        <start>true</start>
        <options>-Xmx256m -DRedirectStreamsToLog=true -DXSD_VALIDATE=false</options>
        <module>genesis-pal-eventhandler</module>
        <package>global.genesis.eventhandler.pal</package>
        <script>alpha-eventhandler.kts</script>
        <description>Handles events</description>
        <classpath>alpha-messages*,alpha-eventhandler*</classpath>
        <language>pal</language>
    </process>
</processes>
Further information can be found in our page on the -processes.xml file.
You can then add the following content to the server/jvm/alpha-config/src/main/resources/cfg/alpha-service-definitions.xml file:
<configuration>
    <service host="localhost" name="ALPHA_DATASERVER" port="11000"/>
    <service host="localhost" name="ALPHA_EVENT_HANDLER" port="11001"/>
</configuration>
Further information can be found in the page on the -service-definitions.xml file.
Database layer
You can specify which database to use in your application by editing genesis-system-definition.kts, which is located in genesis-product\alpha-site-specific\src\main\resources\cfg\. Choose the appropriate environment you are using.
Further information can be found in the page on the genesis-system-definition.kts file.
import Tabs from '@theme/Tabs'; import TabItem from '@theme/TabItem';
systemDefinition {
    global {
        ...
        item(name = "DbLayer", value = "SQL")
        item(name = "DictionarySource", value = "DB")
        item(name = "AliasSource", value = "DB")
        item(name = "MetricsEnabled", value = "false")
        item(name = "ZeroMQProxyInboundPort", value = "5001")
        item(name = "ZeroMQProxyOutboundPort", value = "5000")
        item(name = "DbHost", value = "jdbc:postgresql://localhost:5432/?user=postgres&password=docker")
        item(name = "DbMode", value = "VANILLA")
        item(name = "DbSqlConnectionPoolSize", value = "4")
        ...
    }
}
Further information can be found in the genesis-system-definitions.kts file.
Connect the front end to the server
We have two different approaches to connect to the server, depending on your runtime environment.
In this tutorial, you need to verify the default API_HOST in the package.json in client/web/.
<Tabs
defaultValue='Intellij Plugin'
values={[
{ label: 'Intellij Plugin', value : 'Intellij Plugin' },
{ label: 'Docker', value: 'Docker' },
{ label: 'WSL', value: 'WSL'}
]}>
{
  "name": "@genesislcap/alpha-web-client",
  "description": "Developer Training Web Client",
  "version": "0.0.1",
  "private": true,
  "license": "Apache-2.0",
  "config": {
    "API_HOST": "ws://localhost:9064",
    "DEFAULT_USER": "JaneDee",
    "DEFAULT_PASSWORD": "beONneON*74",
    "PORT": 6060
  },
{
  "name": "@genesislcap/alpha-web-client",
  "description": "Developer Training Web Client",
  "version": "0.0.1",
  "private": true,
  "license": "Apache-2.0",
  "config": {
    "API_HOST": "ws://localhost/gwf/",
    "DEFAULT_USER": "JaneDee",
    "DEFAULT_PASSWORD": "beONneON*74",
    "PORT": 6060
  },
Build and deploy
Finally, you can build and deploy the server.
Build
- In the Gradle menu on the right of IntelliJ, select:
genesisproduct-alpha
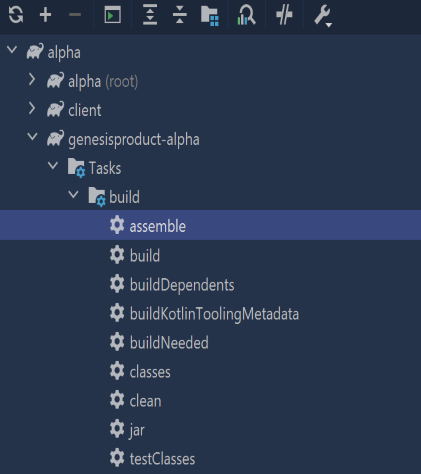
If you prefer to run the config from the command line:
./gradlew :genesisproduct-alpha:assemble
Deploy
As soon as the Build is done, you need to deploy the application. Here are the two ways to deploy using different runtime environments.
<Tabs defaultValue="Intellij Plugin" values={[{ label: 'Intellij Plugin', value: 'Intellij Plugin', },{ label: 'Docker', value: 'Docker'} ,{ label: 'WSL', value: 'WSL'}]}>
Start up plugin
After the Gradle tasks, when first using the plugin with a project, you must create your genesis home folder; click on the Install Genesis button on the Tool window.

This generates a hidden folder called .genesis-home in your project root, ready to run your application's processes.
On the first run, this could take up to 20 minutes, because it performs a full build of your application.
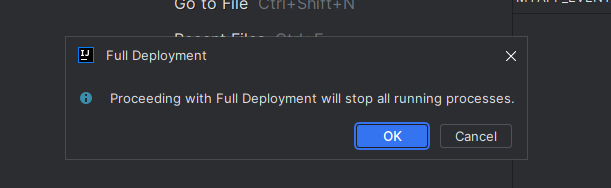
- Click on the Deploy Genesis button on the toolbar.
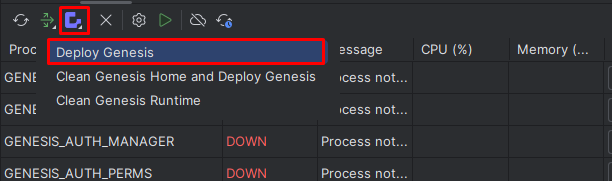
- Redeploying the application requires the Genesis processes to be stopped. If you are prompted for this, click ok to continue.
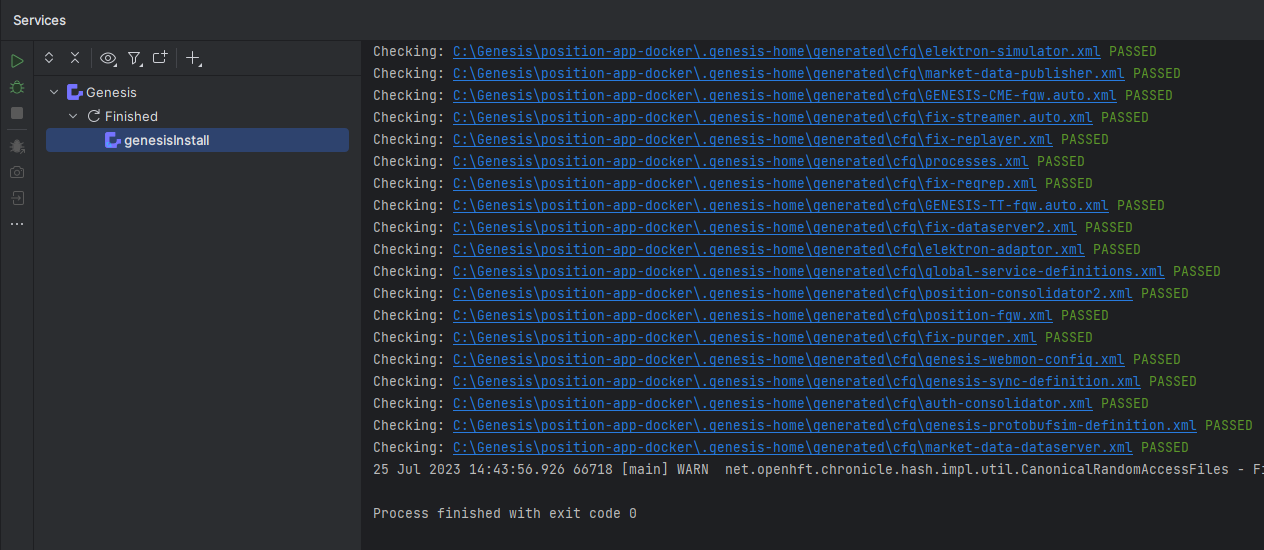
This starts the relevant processes and the logs will be shown below.
./gradlew assemble
docker-compose build
docker-compose up -d
The Genesis platform provides several tasks that help to set up the Genesis environment so that you can deploy a project to it. It can be used on Linux machines (local and over SSH) or Windows machines with WSL support.
Pre-requisites
Please add the last three highlighted lines in your gradle.properties file from the server/jvm folder. The final file should be like this:
kotlin.code.style=official
org.gradle.jvmargs=-Xmx6g -Xss512k -XX:+HeapDumpOnOutOfMemoryError -XX:+UseG1GC -XX:+UseStringDeduplication -XX:ReservedCodeCacheSize=512m -Dkotlin.daemon.jvm.options=-Xmx2g -Dfile.encoding=UTF-8
bundleGeneratedClasses=true
genesisVersion=6.4.2
authVersion=6.4.0
deployPluginVersion=6.4.2
genesisArtifactoryPath=https://genesisglobal.jfrog.io/genesisglobal/libs-release-client
genesis-home=/home/genesis/run
wsl-distro=TrainingCentOS
wsl-user=genesis
| Entry | Description |
|---|---|
genesis-home | This is a mandatory property that is a path on the WSL distribution. |
wsl-distro | This is a mandatory property that is the name of the WSL distribution. |
wsl-user | This is an optional property. If omitted, the default WSL user will be used. |
Deployment of the back end
Now we are going to install the Genesis Platform (i.e. Genesis distribution) on the server and then install the back end of our application on the same server. This is all done using the Genesis deploy plugin that comes with several tasks grouped under genesisdeploy and genesissetup.
Deploying to the server
We will run setupEnvironment first (we only need to run it once) to set up the platform on the server. This task executes install-genesis-distribution (copies and unzips the Genesis distribution specified as a dependency) and then configures the installed distribution. So, basically, it installs the Genesis Platform on your local server.
In the Gradle menu on the right of IntelliJ, select genesisproduct-alpha/alpha-deploy/Tasks/genesissetup/setupEnvironment.

./gradlew :genesisproduct-alpha:alpha-deploy:setupEnvironment
After this command is completed, we will have a basic genesis server running.
Deploying the auth module
As our application requires [authentication](/server/access-control/introduction/), we have to install the Genesis Auth module.In the Gradle menu on the right of IntelliJ, select genesisproduct-alpha/alpha-deploy/Tasks/genesissetup/install-auth-distribution.zip.
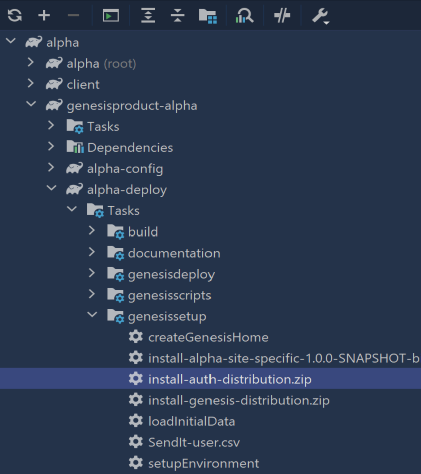
./gradlew :genesisproduct-alpha:alpha-deploy:install-auth-distribution.zip
Deploying the site-specific
As our application will override the standard definitions using the site-specific folder, we have to run this task.In the Gradle menu on the right of IntelliJ, select genesisproduct-alpha/alpha-deploy/Tasks/genesissetup/install-alpha-site-specific-1.0.0-SNAPSHOT-bin.zip-distribution.zip.
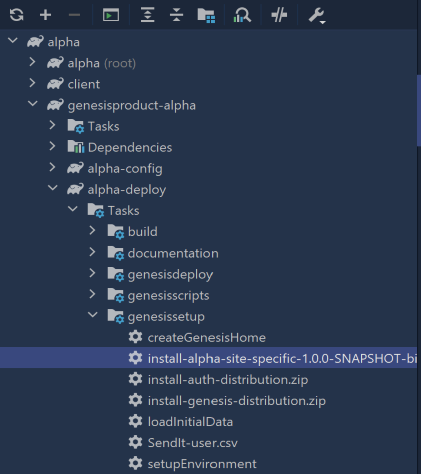
./gradlew :genesisproduct-alpha:alpha-deploy:install-alpha-site-specific-1.0.0-SNAPSHOT-bin.zip-distribution.zip
Deploying the alpha product
Now we have to deploy our application, the alpha product.
In the Gradle menu on the right of IntelliJ, select genesisproduct-alpha/alpha-deploy/Tasks/genesisdeploy/deploy-genesisproduct-alpha.zip.
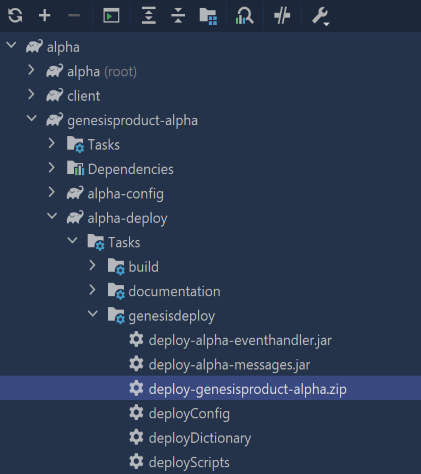
./gradlew :genesisproduct-alpha:alpha-deploy:deploy-genesisproduct-alpha.zip
Congratulations! You have built an application and you are running a database. The next step is to run the application.