Quick start - run the application
import Tabs from '@theme/Tabs'; import TabItem from '@theme/TabItem';
Credentials to login
Now that you have your database up and running, you need to send the login information so you can access the application you have just created.
<Tabs defaultValue="Intellij Plugin" values={[{ label: 'Intellij Plugin', value: 'Intellij Plugin', },{ label: 'Docker', value: 'Docker'} ,{ label: 'WSL', value: 'WSL'}]}>
Create a new schema
Before you can run your application, you need to create a new schema for the database; this is where all tables will be created. To do that, follow these two steps:
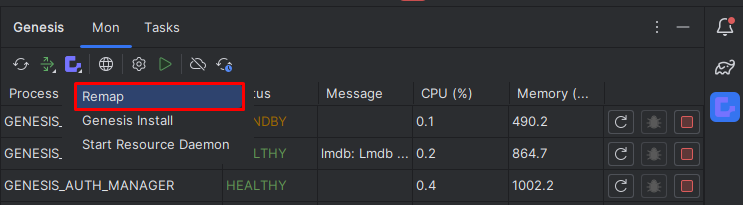
- Run
genesis-install.

- Run
remap.
Send data to genesis
Go to server/jvm/alpha-site-specific/src/main/resources/data/user.csv

You will be prompted the following message. Type y to proceed.
WARNING: Are you sure you want to import all the tables from all the csv files to the database? (y/n)
After that, you have all the data to start the application.
Want to check if your data has been sent?
type table USER and then search 1 you will be displayed the following:
==================================
Genesis Database Monitor
Enter 'help' for a list of commands
==================================
DbMon>table USER
DbMon:USER>search 1
==================================
USER
==================================
Field Name                               Value                                    Type
===========================================================================================
TIMESTAMP                                2023-04-20 18:59:04.080(n:0,s:1428)      NANO_TIMESTAMP
COMPANY_ID                                                                        STRING
COMPANY_NAME                             GENESIS                                  STRING
DOMAIN                                                                            STRING
EMAIL_ADDRESS                            jane.dee@genesis.global                  STRING
FIRST_NAME                               Jane                                     STRING
LAST_LOGIN                               2016-04-28                               DATE
LAST_NAME                                Dee                                      STRING
ONLINE                                   false                                    BOOLEAN
PASSWORD                                 1cf46a0c2148f6399159ff576768d715b5207... STRING
PASSWORD_EXPIRY_DATETIME                                                          DATETIME
REFRESH_TOKEN                            dPbpA8ej38DzoEG44t0lyLrjeL80TMqR         STRING
STATUS                                   ENABLED                                  STRING
USER_NAME                                JaneDee                                  STRING
-------------------------------------------------------------------------------------------
-------------------------------------------------------------------------------------------
Total Results:  1
DbMon:USER>
We shall run the task loadInitialData. This adds the data in a file called USER.csv to be imported into the USER table in your database. The USER table, among other users and permissioning tables, is defined by the Genesis Auth module that we installed previously.
In the Gradle menu on the right of IntelliJ, select genesisproduct-alpha/alpha-deploy/Tasks/genesissetup/loadInitialData.
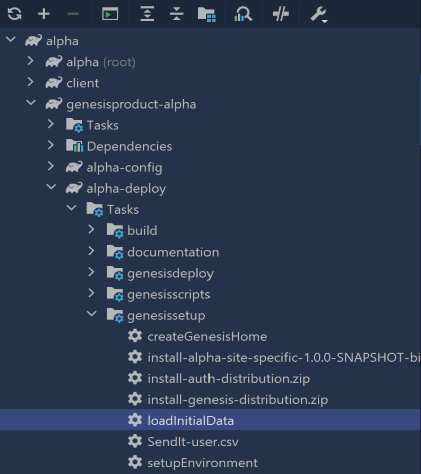
./gradlew :genesisproduct-alpha:alpha-deploy:loadInitialData
Want to check if your data has been sent?
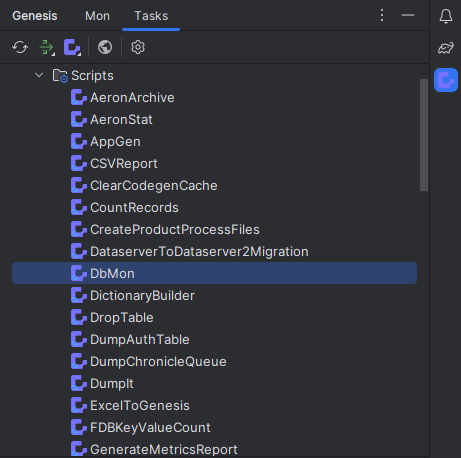
To check your database, in the Gradle menu on the right of IntelliJ, select genesisproduct-alpha/alpha-deploy/Tasks/genesisscripts/DbMon.
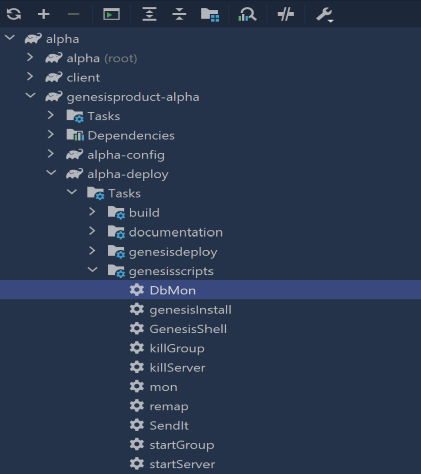
./gradlew :genesisproduct-alpha:alpha-deploy:DbMon
type table USER and then search 1 you will be displayed the following:
==================================
Genesis Database Monitor
Enter 'help' for a list of commands
==================================
DbMon>table USER
DbMon:USER>search 1
==================================
USER
==================================
Field Name                               Value                                    Type
===========================================================================================
TIMESTAMP                                2023-04-20 18:59:04.080(n:0,s:1428)      NANO_TIMESTAMP
COMPANY_ID                                                                        STRING
COMPANY_NAME                             GENESIS                                  STRING
DOMAIN                                                                            STRING
EMAIL_ADDRESS                            jane.dee@genesis.global                  STRING
FIRST_NAME                               Jane                                     STRING
LAST_LOGIN                               2016-04-28                               DATE
LAST_NAME                                Dee                                      STRING
ONLINE                                   false                                    BOOLEAN
PASSWORD                                 1cf46a0c2148f6399159ff576768d715b5207... STRING
PASSWORD_EXPIRY_DATETIME                                                          DATETIME
REFRESH_TOKEN                            dPbpA8ej38DzoEG44t0lyLrjeL80TMqR         STRING
STATUS                                   ENABLED                                  STRING
USER_NAME                                JaneDee                                  STRING
-------------------------------------------------------------------------------------------
-------------------------------------------------------------------------------------------
Total Results:  1
DbMon:USER>
We shall run the task loadInitialData. This adds the data in a file called USER.csv to be imported into the USER table in your database. The USER table, among other users and permissioning tables, is defined by the Genesis Auth module that we installed previously.
In the Gradle menu on the right of IntelliJ, select genesisproduct-alpha/alpha-deploy/Tasks/genesissetup/loadInitialData.
./gradlew :genesisproduct-alpha:alpha-deploy:loadInitialData
Want to check if your data has been sent?
To check your database, in the Gradle menu on the right of IntelliJ, select genesisproduct-alpha/alpha-deploy/Tasks/genesisscripts/DbMon.
./gradlew :genesisproduct-alpha:alpha-deploy:DbMon
type table USER and then search 1 you will be displayed the following:
==================================
Genesis Database Monitor
Enter 'help' for a list of commands
==================================
DbMon>table USER
DbMon:USER>search 1
==================================
USER
==================================
Field Name                               Value                                    Type
===========================================================================================
TIMESTAMP                                2023-04-20 18:59:04.080(n:0,s:1428)      NANO_TIMESTAMP
COMPANY_ID                                                                        STRING
COMPANY_NAME                             GENESIS                                  STRING
DOMAIN                                                                            STRING
EMAIL_ADDRESS                            jane.dee@genesis.global                  STRING
FIRST_NAME                               Jane                                     STRING
LAST_LOGIN                               2016-04-28                               DATE
LAST_NAME                                Dee                                      STRING
ONLINE                                   false                                    BOOLEAN
PASSWORD                                 1cf46a0c2148f6399159ff576768d715b5207... STRING
PASSWORD_EXPIRY_DATETIME                                                          DATETIME
REFRESH_TOKEN                            dPbpA8ej38DzoEG44t0lyLrjeL80TMqR         STRING
STATUS                                   ENABLED                                  STRING
USER_NAME                                JaneDee                                  STRING
-------------------------------------------------------------------------------------------
-------------------------------------------------------------------------------------------
Total Results:  1
DbMon:USER>
Starting the server
Now we need to start the servers. To do that, follow the structions below according to your environment configuration.
<Tabs defaultValue="Intellij Plugin" values={[{ label: 'Intellij Plugin', value: 'Intellij Plugin', },{ label: 'Docker', value: 'Docker'} ,{ label: 'WSL', value: 'WSL'}]}>
-
Start the resource deamon.
-
Once your resource deamon has started, you can see your Genesis processes listed. Click on the start button for each process to start it.
Wait for all the processes to be healthy (it may take a few minutes for the first run).
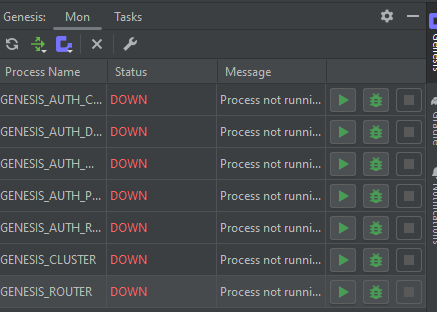
If you are running on docker, your processes has already been started. Now, let's run the Genesis command mon to see if all processes are up and running on the server:
In the Gradle menu on the right of IntelliJ, select genesisproduct-alpha/alpha-deploy/Tasks/genesisscripts/mon.
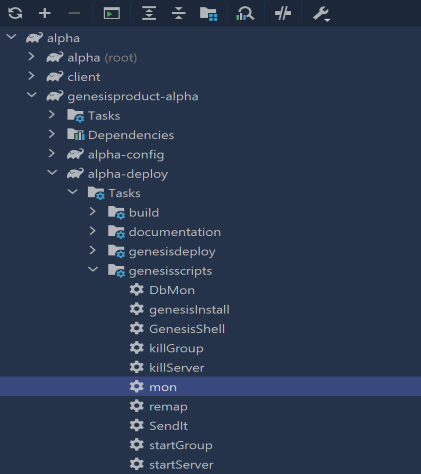
./gradlew :genesisproduct-alpha:alpha-deploy:mon
we should see something like this
PID     Process Name                  Port        Status         CPU       Memory    Message
===============================================================================================
426     GENESIS_AUTH_CONSOLIDATOR     8005        STANDBY        36.30     1.30
350     GENESIS_AUTH_DATASERVER       8002        RUNNING        56.70     1.70
334     GENESIS_AUTH_MANAGER          8001        RUNNING        61.50     1.70
368     GENESIS_AUTH_PERMS            8003        RUNNING        65.70     1.90
403     GENESIS_AUTH_REQUEST_SERVER   8004        RUNNING        56.80     1.60
490     GENESIS_CLUSTER               9000        RUNNING        84.30     2.50
570     GENESIS_ROUTER                9017        RUNNING        54.70     2.00
534     GENESIS_WEBMON                9011        RUNNING        51.30     2.50
===============================================================================================
664     ALPHA_DATASERVER              11000       RUNNING        58.10     1.50
703     ALPHA_EVENT_HANDLER           11001       RUNNING        71.30     2.20
Try to run mon from the command line as well!
If you are running on wsl, your processes has already been started. Now, let's run the Genesis command mon to see if all processes are up and running on the server:
In the Gradle menu on the right of IntelliJ, select genesisproduct-alpha/alpha-deploy/Tasks/genesisscripts/mon.
./gradlew :genesisproduct-alpha:alpha-deploy:mon
we should see something like this
PID     Process Name                  Port        Status         CPU       Memory    Message
===============================================================================================
426     GENESIS_AUTH_CONSOLIDATOR     8005        STANDBY        36.30     1.30
350     GENESIS_AUTH_DATASERVER       8002        RUNNING        56.70     1.70
334     GENESIS_AUTH_MANAGER          8001        RUNNING        61.50     1.70
368     GENESIS_AUTH_PERMS            8003        RUNNING        65.70     1.90
403     GENESIS_AUTH_REQUEST_SERVER   8004        RUNNING        56.80     1.60
490     GENESIS_CLUSTER               9000        RUNNING        84.30     2.50
570     GENESIS_ROUTER                9017        RUNNING        54.70     2.00
534     GENESIS_WEBMON                9011        RUNNING        51.30     2.50
===============================================================================================
664     ALPHA_DATASERVER              11000       RUNNING        58.10     1.50
703     ALPHA_EVENT_HANDLER           11001       RUNNING        71.30     2.20
Try to run mon from the command line as well!
See here for extra details on how to configure the Genesis deploy plugin.
Accessing the application
Now you are ready to run the application you have created for the front end.
<Tabs defaultValue="Intellij Plugin" values={[{ label: 'Intellij Plugin', value: 'Intellij Plugin', },{ label: 'Docker', value: 'Docker'} ,{ label: 'WSL', value: 'WSL'}]}>
Using the Genesis IntelliJ plugin click the Start UI button (this is the small globe) on the toolbar as shown below. This builds your front-end codebase and starts the webpack webserver in development mode.
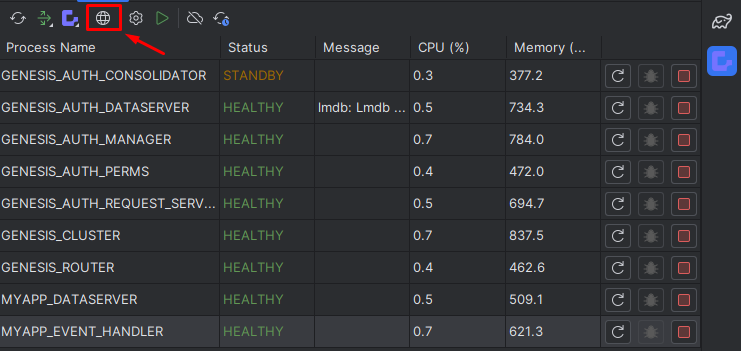
The application will open at http://localhost:6060/login.

The application will open at http://localhost:6060/login.
The application will open at http://localhost:6060/login.
Conclusion
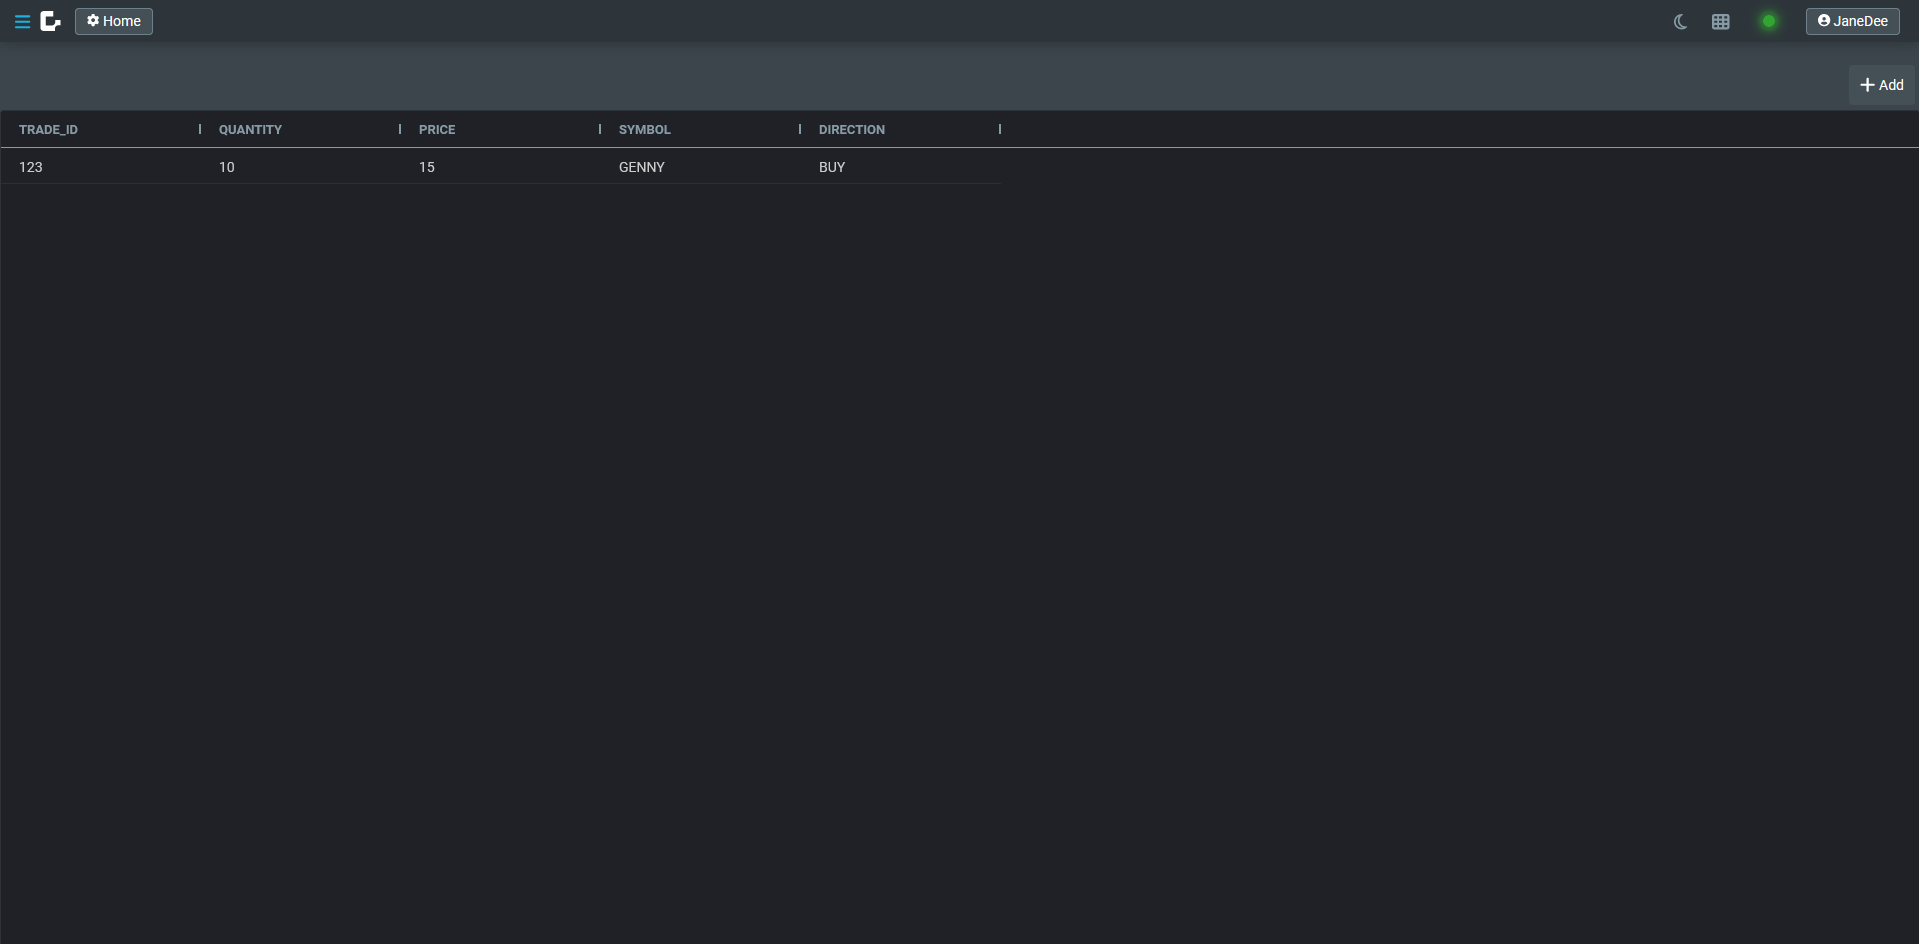
That’s it. You have quickly built a very simple application using some fundamental Genesis components. You can see a grid of trades. Try adding a new one. The login details are:
- login name: JaneDee
- password: beONneON*74
When you have logged in, the screen is empty, but note the ADD button at the top right. You can click on this to add some dummy trade details.
Below, we have added two trades. We have sold MMM at 404 and bought back at 401.5.
There's obviously a lot more to building enterprise-ready applications. However, you now have enough knowledge and experience of the Genesis low-code platform to look at our reference documentation and learn more there.